Building a ERC20 Token App on Starknet with Starknet React: A Comprehensive Guide
This guide offers steps to build a React web application with Starknet React to interact with ERC20 smart contract on Starknet. Meanwhile you can get the source code from our Github repo. Readers will:
- Understand how to implement the ERC20 interface
- Discover ways to engage with contracts within a React application
- Design their own ERC20 token and initiate it on Starknet
A prerequisite for this guide is a foundational understanding of both the Cairo programming language and ReactJS. Additionally, ensure Node.js and NPM are installed on the system.
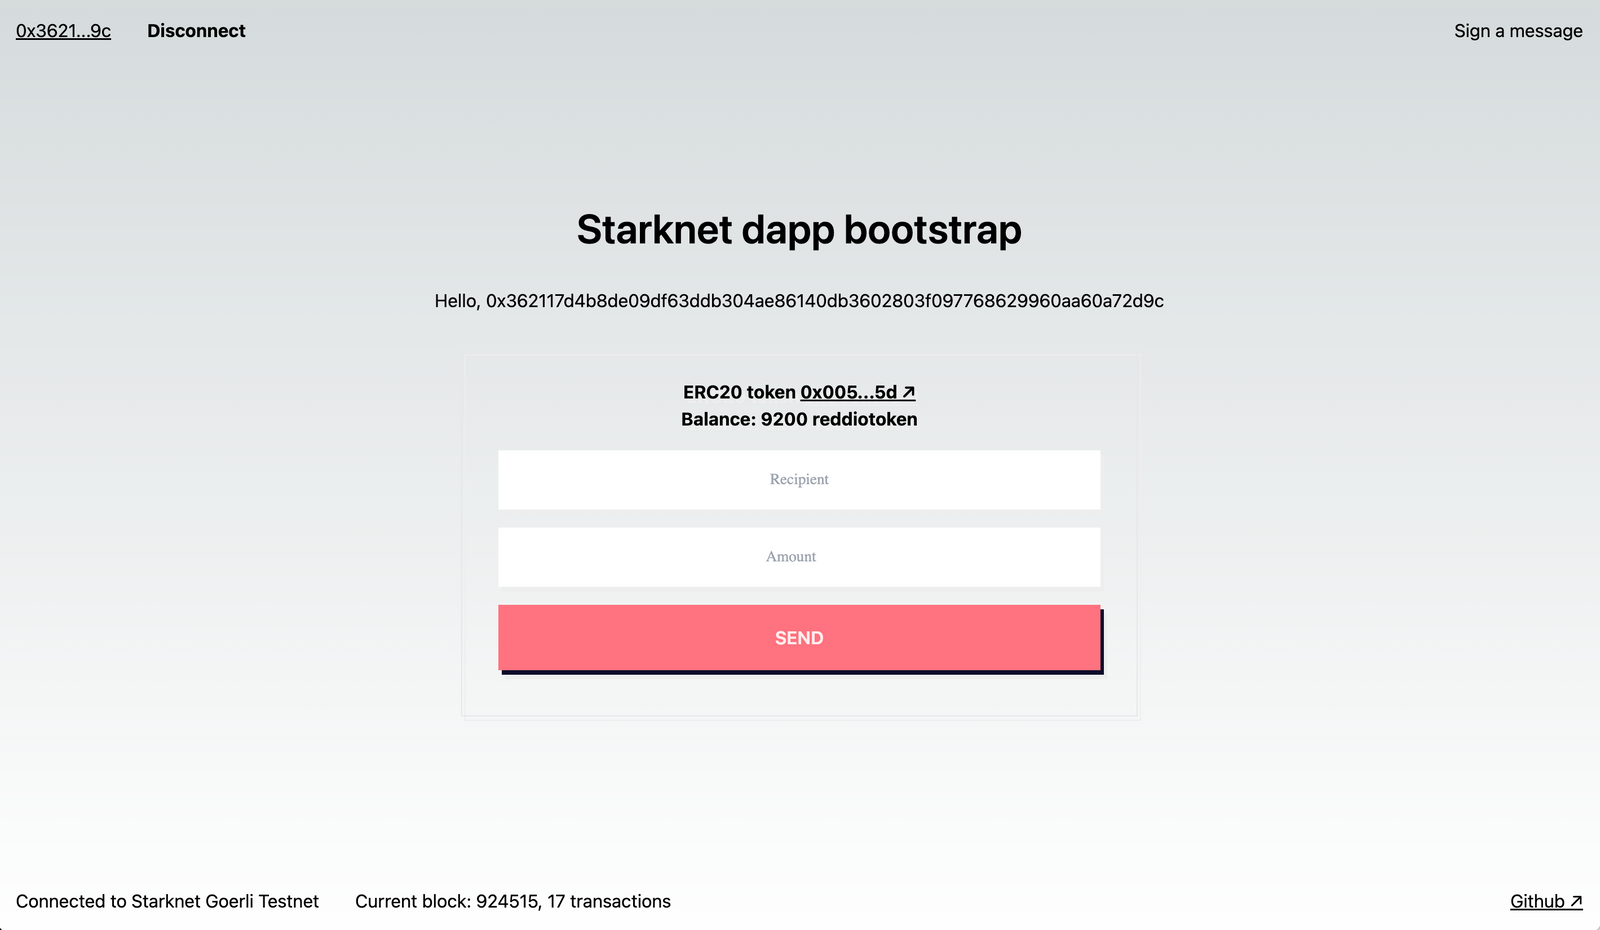
The guide will walk through creating an ERC20 token named reddiotoken and crafting a web3 interface for functionalities such as balance verification and token transfer.
Deploy a ERC20 smart contract on Starknet
Follow this guide to deploy the smart contract, if you do it correctly, you should be able to get a ERC20 smart contract deployed on Starknet testnet with name 'reddio token', get 1,000,000 tokens minted and also get the smart contract address correspondingly. These are quite important for our next integrations. For your convenience, we already integrate the Starknet project to the repo, you can compile and deploy directly.
Introduction to Starknet.js and Starknet React
Starknet.js is a JavaScript/TypeScript library designed to connect your website or decentralized application (dApp) to Starknet. It aims to mimic the architecture of ethers.js, so if you are familiar with ethers, you should find Starknet.js easy to work with.

To make the Starknet.js integration easy for React developers, inspired by wagmi, starknet-react (documentation) is developed by the community, to provide developers a collection of React hooks tailored for Starknet.
Integrating Starknet React to your React App
To integrate Starket-react, you just need to add the following dependency to your React app.
"@starknet-react/chains": "^0.1.0",
"@starknet-react/core": "^2.0.0",
"get-starknet-core": "^3.2.0",
In the StarknetConfig component of starknetprovider.tsx, it lets you specify wallet connection options for users through its connectors prop.
  export function StarknetProvider({ children }: { children: React.ReactNode }) {
  const { connectors } = useInjectedConnectors({
    // Show these connectors if the user has no connector installed.
    recommended: [argent(), braavos()],
    // Hide recommended connectors if the user has any connector installed.
    includeRecommended: "onlyIfNoConnectors",
    // Sort connectors alphabetically by their id.
    order: "alphabetical",
  });

  return (
    // React context that provides access to
    // starknet-react hooks and shared state
    <StarknetConfig
      chains={[goerli]}
      provider={reddioProvider({apiKey})}
      connectors={connectors}
      // autoConnect={false}
    >
      {children}
    </StarknetConfig>
  );
Establishing connection and managing account
After defining the connectors in the config, you can use a hook to access them. This enables users to connect their wallets.
  export default function Connect() {
  const { connect, connectors } = useConnect();

  return (
    <div className="flex justify-center gap-8">
      {connectors.map((connector) => (
        <button
          className="btn"
          onClick={() => connect({ connector })}
          key={connector.id}
          disabled={!connector.available()}
        >
          Connect {connector.id}
        </button>
      ))}
    </div>
  );
}
Once connected, the useAccount hook provides access to the connected account, giving insights into the connection's current state. State values like isConnected and isReconnecting update automatically, easing UI updates. This is particularly useful for asynchronous processes, removing the need for manual state management in your components.
Smart contract interactions
Similarly to wagmi, Starknet React has useContractRead for read operations on smart contracts. These operations are independent of the user's connection status and don't require a signer. The useBalance hook simplifies retrieving balances without needing an ABI.
  // Convenience hook for getting
  // formatted ERC20 balance
  const { data: balance } = useBalance({
    address,
    token: CONTRACT_ADDRESS,
    // watch: true <- refresh at every block
  });
Unlike wagmi, the useContractWrite hook benefits from Starknet's native support for multicall transactions. This improves user experience by facilitating multiple transactions without individual approvals.
  const calls = useMemo(() => {
    if (!amount || !to || !contract || !balance) return;

    // format the amount from a string into a Uint256
    const amountAsUint256 = cairo.uint256(
      BigInt(Number(amount) * 10 ** balance.decimals)
    );

    return contract.populateTransaction["transfer"](to, amountAsUint256);
  }, [to, amount, contract, balance]);

  // Hook returns function to trigger multicall transaction
  // and state of tx after being sent
  const { write, isPending, data } = useContractWrite({
    calls,
  });
To make the App UX better, you can refer to Stark react documentation to integrate more hooks into the sample app.
Summary
In this blog, we guided you through how you can easily integrate Stark React and quickly build a Token App. Hopefully, it helps you to easily understand the mechanism and get your own App up and running quickly. We will publish more such sample App, you can follow our Github page to get updates or join our Discord if you want to contribute to the source codes or if you have any questions.