Building a Decentralized Ethereum NFT Marketplace: A Comprehensive Guide
Excited to share our latest blog: "Building a Decentralized Ethereum NFT Marketplace: A Comprehensive Guide" 🌐✨ Explore smart contract development, frontend integration, and IPFS incorporation.
1. Introduction:
Hey there! 👋 I'm Neil, founder of Reddio.com and a blockchain enthusiast who's sharing my knowledge at Nanyang Technological University (NTU) as a guest lecturer on blockchain courses. Today, let's walk you through the Ethereum NFT marketplace bootstrap in this Github repo.
Why NFTs?
NFTs, or Non-Fungible Tokens, have taken the digital world by storm, revolutionizing both digital ownership and authenticity. In this tutorial, we'll explore the basics and learn how to create your very own decentralized marketplace.
What's in Store?
We'll keep it simple, focusing on smart contracts, frontend development, and using IPFS for decentralized file storage. No need to be a coding guru; we'll walk through each step together.
Ready? Let's dive in!
2. Setting Up the Project:
Let's get your Ethereum NFT marketplace up and running! 🚀
1. Clone the Repository
git clone https://github.com/reddio-com/ethereum-nft-marketplace.git
cd ethereum-nft-marketplace
yarn
2. Run a Local Ethereum Node
npx hardhat node
3. Deploy the Smart Contract Locally
npx hardhat run scripts/deploy.js --network localhost
This will print out addresses where the contract was deployed. Update .evn.local with these values:
NEXT_PUBLIC_NFTMARKET_ADDRESS="your-nft-market-address" NEXT_PUBLIC_NFT_ADDRESS="your-nft-address"
4. Set Up Infura Account
Create an account at Infura, create a project, and enable Dedicated Gateways. Update values in .evn.local accordingly:
NEXT_PUBLIC_IPFS_PROJECT_ID="your-infura-project-id" NEXT_PUBLIC_API_KEY_SECRET="your-infura-project-secret"
5. Run the Development Server
yarn dev
That's it! Make sure you select the right network on your Metamask, and you're all set to build your own Ethereum NFT marketplace. Happy coding! 😊
3. Source Code Walk Through
In this section, we briefly walk you through how we mint NFT, create the sales, buy NFT and list NFTs.
3.1 Creating an NFT: create-items.js
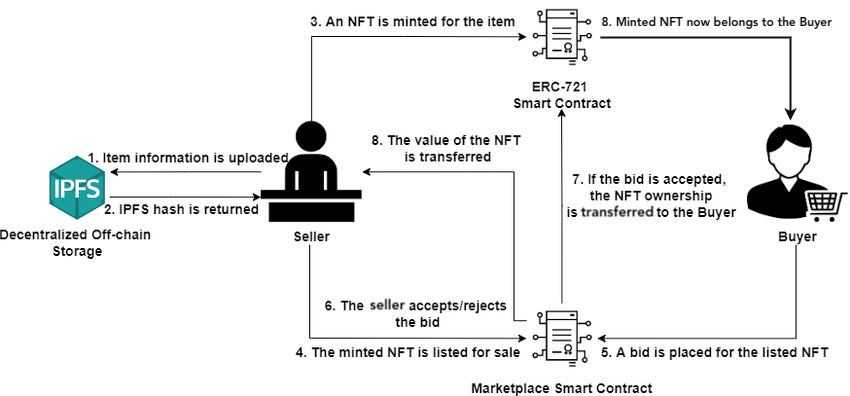
The journey begins with empowering users to mint their digital assets as NFTs and list them for sale. The create-items.js file in our frontend source code is responsible for this critical step.
// ... (imports and setup)

const createSale = async (url) => {
  try {
    // Connect to the user's Ethereum wallet
    const web3Modal = new Web3Modal({ network: "mainnet", cacheProvider: true });
    const connection = await web3Modal.connect();
    const provider = new ethers.providers.Web3Provider(connection);
    const signer = provider.getSigner();

    // Initialize the NFT smart contract
    const contract = new ethers.Contract(nftaddress, NFT.abi, signer);

    // Mint the new token
    const transaction = await contract.createToken(url);
    const tx = await transaction.wait();

    // Extract the new token's ID from the transaction
    const tokenId = tx.events[0].args[2].toNumber();

    // Initialize the NFTMarket smart contract
    const marketContract = new ethers.Contract(nftmarketaddress, Market.abi, signer);

    // Create a new market item for the minted NFT
    const listingPrice = web3.utils.toWei('0.1', 'ether');
    await marketContract.createMarketItem(nftaddress, tokenId, price, { value: listingPrice });

    // Redirect the user to the home page
    router.push('/');
  } catch (error) {
    console.error('Error creating NFT sale:', error);
  }
};

// ... (rendering logic)
In this snippet, the createSale function handles the entire process, from connecting the user's wallet to minting the NFT and listing it on the marketplace. The crucial steps include connecting to the wallet, initializing the NFT smart contract, minting the new token, and creating a market item.
Solidity Smart Contract (NFT)
// ... (imports and setup)

contract NFT is ERC721URIStorage {
    using Counters for Counters.Counter;
    Counters.Counter private _tokenIds;
    address contractAddress;

    constructor(address marketplaceAddress) ERC721("ReddioNFTs", "RNFT") {
        contractAddress = marketplaceAddress;
    }

    function createToken(string memory tokenURI) public returns (uint) {
        _tokenIds.increment();
        uint256 newItemId = _tokenIds.current();

        _mint(msg.sender, newItemId);
        _setTokenURI(newItemId, tokenURI);
        setApprovalForAll(contractAddress, true);
        return newItemId;
    }
}
The Solidity smart contract (NFT.sol) complements the frontend logic by providing a method (createToken) for users to mint new NFTs. The contract ensures proper ownership and sets approval for the marketplace contract to transfer tokens.
3.2 Calling the NFT Smart Contract
Once an NFT is created, users need a way to view their owned assets. The my-nft.js file takes center stage in this step.
// ... (imports and setup)

const loadNFTs = async () => {
  try {
    // Connect to the user's Ethereum wallet
    const web3Modal = new Web3Modal({ network: "mainnet", cacheProvider: true });
    const connection = await web3Modal.connect();
    const provider = new ethers.providers.Web3Provider(connection);
    const signer = provider.getSigner();

    // Initialize the NFTMarket smart contract
    const marketContract = new ethers.Contract(nftmarketaddress, Market.abi, signer);

    // Fetch NFTs owned by the user
    const data = await marketContract.fetchMyNFTs();

    // Process and display fetched NFTs
    const items = await Promise.all(data.map(async i => {
      // ... (fetching additional data and processing)
    }));

    // Update component state with fetched NFTs
    setNfts(items);
    setLoaded('loaded');
  } catch (error) {
    console.error('Error loading my NFTs:', error);
  }
};

// ... (rendering logic)
Here, the loadNFTs function connects to the user's wallet, initializes the NFTMarket smart contract, and fetches the NFTs owned by the user. The fetched data is then processed and displayed in the UI.
Solidity Smart Contract (NFTMarket)
// ... (imports and setup)

contract NFTMarket is ReentrancyGuard {
  using Counters for Counters.Counter;
  Counters.Counter private _itemIds;
  Counters.Counter private _itemsSold;

  // ... (state variables and event definitions)

  function fetchMyNFTs() public view returns (MarketItem[] memory) {
    // ... (function implementation)
  }

  // ... (additional functions)
}
The Solidity smart contract (NFTMarket.sol) provides the backend logic for fetching NFTs owned by a user. The fetchMyNFTs function retrieves the relevant information from the contract state.
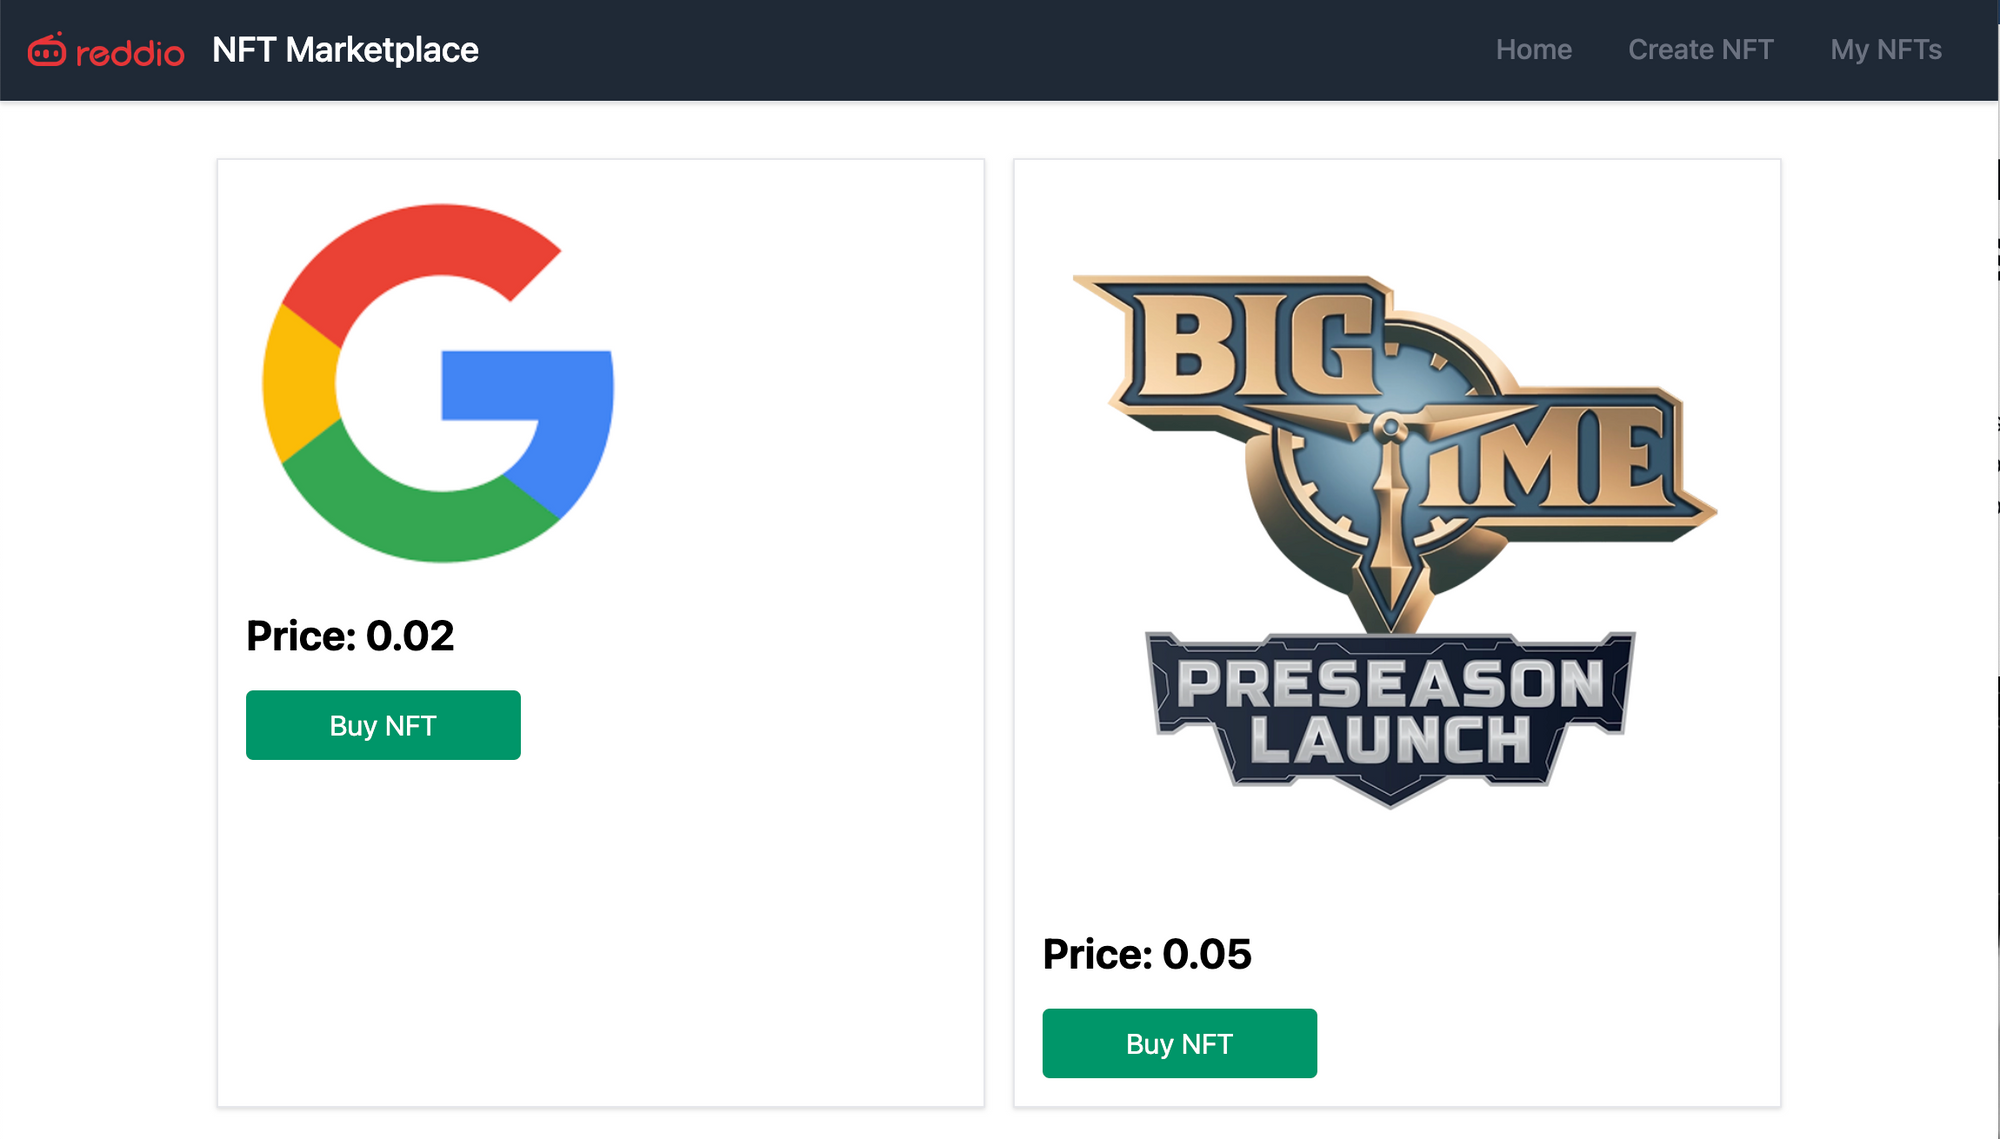
3.3 Listing NFTs: index.js
The index.js file is crucial in presenting users with a marketplace where they can explore and purchase NFTs created by others.
// ... (imports and setup)

const loadNFTs = async () => {
  // ... (function implementation)
};

const buyNft = async (nft) => {
  try {
    // ... (wallet connection and contract initialization)

    // Purchase the selected NFT
    const transaction = await contract.createMarketSale(nftaddress, nft.tokenId, {
      value: price
    });

    // Wait for the transaction to complete
    await transaction.wait();

    // Reload NFTs to reflect the updated state
    loadNFTs();
  } catch (error) {
    console.error('Error buying NFT:', error);
  }
};

// ... (rendering logic)
The loadNFTs function here serves a dual purpose—it populates the marketplace with available NFTs and allows users to explore the offerings. The buyNft function handles the purchase process when a user decides to acquire an NFT.
Solidity Smart Contract (NFTMarket)
// ... (imports and setup)

contract NFTMarket is ReentrancyGuard {
  // ... (state variables and event definitions)

  function createMarketSale(
    address nftContract,
    uint256 itemId
  ) public payable nonReentrant {
    // ... (function implementation)
  }

  function fetchMarketItems() public view returns (MarketItem[] memory) {
    // ... (function implementation)
  }

  // ... (additional functions)
}
The createMarketSale function in the Solidity smart contract facilitates the purchase of an NFT, transferring ownership and funds between the buyer and the seller.
This exploration of the Reddio NFT marketplace's frontend development, intertwined with Solidity smart contract snippets, offers a comprehensive look into the mechanics of decentralized applications.
4. Styling and Structure (_app.js):
The _app.js file sets up the overall structure and styling for the entire application. It includes a navigation bar with links to the home page, create NFT page, and my NFTs page. The application uses Tailwind CSS for styling.
The frontend development of the Reddio NFT Marketplace leverages Next.js and React to create a dynamic and responsive user interface. Users can seamlessly browse, create, and manage their NFTs through an intuitive and visually appealing design. The integration with smart contracts allows for secure and transparent transactions within the marketplace.
5. IPFS Integration:
In the decentralized landscape of Reddio's NFT marketplace, InterPlanetary File System (IPFS) stands as the backbone for resilient and distributed file storage. This section delves into how IPFS, seamlessly integrated through Infura and its dedicated gateway, enhances the robustness of the platform.
In the creation and listing of NFTs, Reddio employs IPFS to store essential assets like images and metadata. Let's break down how this integration takes place:
Uploading File and Metadata to IPFS:
Snippet from create-items.js
// ... (imports and setup)

const createSale = async (url) => {
  try {
    // ... (wallet connection and contract initialization)

    // Mint the new token
    const transaction = await contract.createToken(url);
    const tx = await transaction.wait();

    // Extract the new token's ID from the transaction
    const tokenId = tx.events[0].args[2].toNumber();

    // ... (other logic)

    // Initialize IPFS client
    const client = ipfsHttpClient({
      host: 'ipfs.infura.io',
      port: 5001,
      protocol: 'https',
      headers: {
        authorization: auth,
      },
    });

    // Upload data to IPFS
    const data = JSON.stringify({
      name, description, image: fileUrl
    });
    const added = await client.add(data);
    const ipfsUrl = `${subdomain}/ipfs/${added.path}`;

    // ... (other logic)
  } catch (error) {
    console.error('Error creating NFT sale:', error);
  }
};

// ... (rendering logic)
Summary
Congratulations! You've embarked on a journey that encompasses the essentials of building a decentralized Ethereum NFT marketplace. From smart contract intricacies to frontend marvels and robust IPFS integration, this guide strives to equip you with the knowledge and tools for your decentralized endeavors.
Ethereum's Limitations: Scalability and Gas Costs
While Ethereum pioneered smart contract functionality and decentralized applications, it faces challenges in scalability and transaction costs. As the network popularity surged, scalability concerns emerged, leading to congestion and higher gas costs. Developers often grapple with the trade-off between decentralized principles and practical usability.
The Future: Reddio's zk Layer 2 Solution
In the upcoming blog, we'll explore a solution to these challenges. Reddio has developed a powerful zk Layer 2 solution that addresses scalability concerns and significantly reduces transaction costs to 0 for offchain. Layer 2 solutions operate atop the Ethereum network, offering enhanced throughput and efficiency without compromising on security.
Our commitment to providing a seamless experience for developers and users alike has driven the creation of this Layer 2 infrastructure. As we progress through the next blogs, we'll guide you through the migration process, transforming your decentralized Ethereum NFT marketplace into a more scalable, cost-effective, and user-friendly ecosystem.
Stay tuned for our next installment, where we'll delve into the specifics of integrating Reddio's Layer 2 solution into your decentralized marketplace. This transition marks a pivotal step toward a more scalable and accessible decentralized future.
Thank you for joining us on this exciting journey, and get ready to usher in a new era of decentralized innovation with Reddio's Layer 2!
Low latency and free Starknet node awaits!
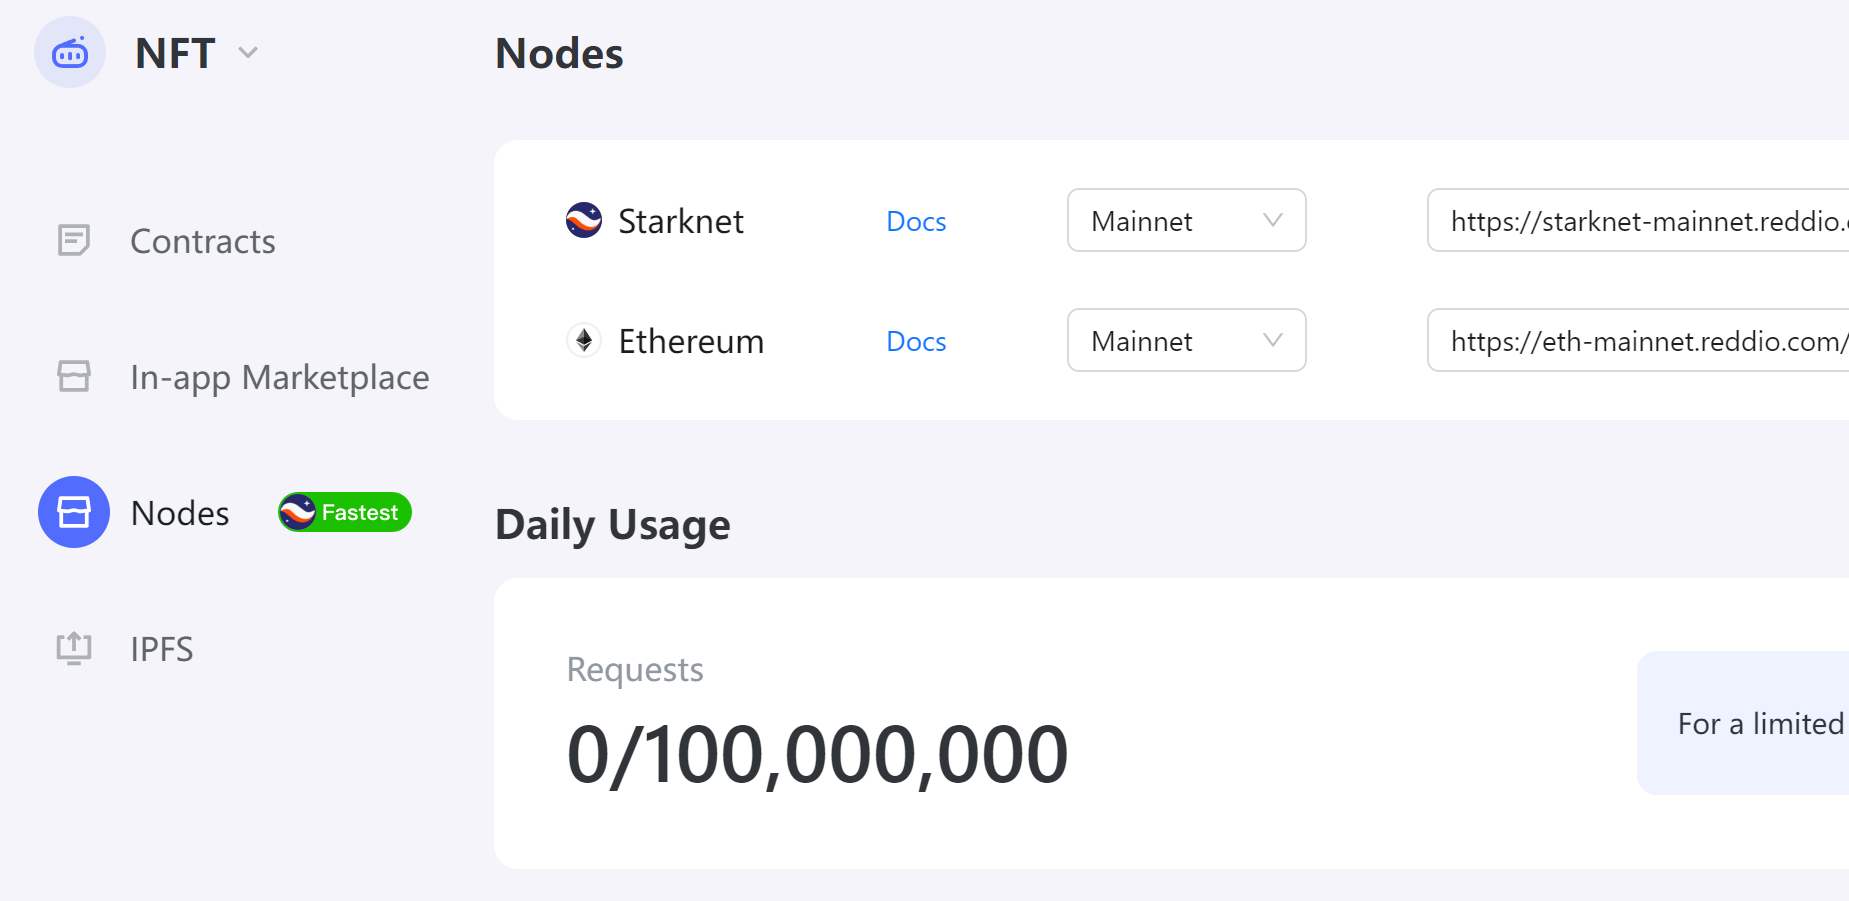
For a limited time, Reddio is offering unrestricted access to its high-speed StarkNet Node, completely free of charge. This is an unparalleled opportunity to experience the fastest connection with the lowest delay. All you need to do is register an account on Reddio at https://dashboard.reddio.com/ and start exploring the limitless possibilities.
You can discover why Reddio claims the fastest connection by reading more here.